2022 in review: IoT, ray tracing and web

Another year has come to pass, and it’s time for some more reflection! Despite its many flaws, the (only? :s) one way this year has been a successful one is through all the code I’ve managed to write. So without delving more into all the melancholy, let’s jump right in on what really matters in life and think of all the great projects I’ve had:

I started the year with embedded development in C#, then did two intensive months of game development - starting by learning Vulkan and ray tracing from scratch, learned Kubernetes and Terraform, a bit of cloud, worked on my homepage, and then did a bit more of embedded stuff by writing some programs to monitor and control factories in Minecraft.

Embedded .NET with Meadow

For the first half of the year I got back to embedded development and managed to drastically improve the UX and reliability of setting short timers. This is all thanks to the Meadow platform having reached a much better maturity compared to how it was the year or two before, when I first started working on it. I even wrote a post about the adventures I had when designing and implementing that system. There’s also a short Youtube clip illustrating how it’s all used in my daily life. At that point I was feeling really good having “shipped” something useful, and moved on to the next topic. Before this (for many many years) I had used the same launcher, but the countdowns were opened to a browser window.

Plus, over time I’ve gotten really used to the system, and thought that I couldn’t ever live without it. This assumption was however challenged a month or two ago, when I upgraded the firmware on the device running the display hardware, instead of the other device I was supposed to develop serial port things on. But what the hell. Let’s just upgrade it to the new OS and get all the promised stability and performance upgrades while at it. Maybe those would even eliminate the very rare restarts when a watchdog timer set by me times out.

One of the big new features of that new release was the inclusion of a new linker, which is able to trim out unused code, greatly reducing both the code size and the startup speed. Unfortunately, this specific linker isn’t implemented the same way as the one by Microsoft in the full .NET SDK, and there seems to be no working developer-facing options to alter its behaviour yet - it's all beta. The way it’s currently implemented strips out code needed by reflection-based serialization, leaving me stranded with my API calls.

One could think that I could always go back to the old OS, but the matter has two obstacles. The first being the tooling, as it is still under active development, and there’s no apparent way to install a previous version. Though I highly doubt it’s been blocked yet, and there’s a responsive Slack channel to ask about these things. But the second one is quite embarrassing. The last time I worked on the codebase, it was when I moved the server side stuff to my Kubernetes server (more on that later), and it turned out to be a more involved operation than originally foreseen.

When I finally got it to work, I was rather frustrated, and seemed to have forgotten to make the final commit - but there’s really no excuse for this kind of irresponsible behaviour. So after I had done the OS update and the code updates to go with it, I no longer had a working version to go back to. Rather than taking the time to fix things, I’ll just have to live with my mistakes until the new OS is at a serviceable state. At least I’ve had plenty of things to keep me busy and not thinking about it. Quite the theme overall…

Vulkan and ray tracing

The timing for my next expedition couldn’t have been better. After I had neatly finished the work on the timer (but before the OS update), there was a bit of time to relax. How unheard of. When it was time for my summer holiday, I was already anxious to try something new. For a long time I’d been meaning to learn Vulkan, and now I also had the spirit and the time for it. And not just Vulkan, if things would progress well.

I think it took me about a week to go through most of the tutorial. I had originally anticipated it to take the whole month, so my spirit was further elevated by that triumph! As detailed in the relevant post, one of my long-lived dreams has been to build a game with realtime soft shadows. I’ve always thought the math for it to be beyond my abilities - except now. Armed with Vulkan and powerful hardware, perhaps I could just brute force my way to it.

And it all started rather promisingly. I learned more than I could have hoped for, and even got good results on the screen, at interactive frame rates.But the quality fell short of what I’d hoped for. And with that, so fell my motivation to work on it. Despite this, I still managed to achieve some rather great things after the initial blog post, namely multiple importance sampling (MIS) and the integration of Nvidia Realtime Denoisers (NRD). Both improving the quality and performance by at least an order of magnitude or two. Almost enough. Almost.

It sucks that I haven’t documented my journey better than I did, as this is the most impressive thing I’ve achieved in a long time. There’s some nice screenshots on my Twitter page, and some short compression-butchered video segments on my Youtube page, but that’s it.

But the reality of it is that the intensive ~two months I worked on the project really burned me out for a long while, despite all the impressive things I achieved. I really enjoyed what I did, but everything has its limits. Though truth be told, RT is perhaps something that I don’t really wish to pursue more. It was very rewarding, but as a concept it’s not really something that interests me that much - I was really only after the results. I thought that simple 2D shadows would be easy to implement with the new technology, but the truth is that they are actually even more complex than 3D ones, at least when implemented the way I approached them. Sunken costs kept me engaged.

But when it comes to using Vulkan as a graphics API, I really did enjoy it a lot. It’s so much nicer than OpenGL, as it’s without all the technical debt of immediate mode rendering and old hardware pipelines, while explicitly supporting all the new things that make development easier and the code more performant, such as pre-compiled shaders and cached pipelines, and multithreaded API design. Though it’s still not easy to use it optimally by any means - especially when it comes to supporting heterogeneous hardware. I already liked OpenGL, and I like Vulkan even more.

A few years back I made yet another version of my unicorn game project - codenamed Unnamed Spacefaring Game: Energized (with modern OpenGL and C#) - and I thought that the code I wrote for it was diamond-grade. Not quite. Or maybe it was, compared to how the previous iterations were implemented on top of a decade+ old Python codebase. I also had big plans for writing the engine side in such a way that it would be able to run efficiently on many-core systems. This wasn’t easy, and it was further complicated by the APIs offered by OpenGL. The solution I arrived on was ambitious, and I feel really bad I never got far enough to really test it in battle.

Vulkan on the other hand has native support for many frames-in-flight and multiple descriptor sets. These features could be used to drastically simplify the resulting architecture, perhaps even completely eliminating the need for all those ambitious inventions I had. I’m very conflicted on how to proceed. Everything sounds almost too simple. Though I guess there’s still some demand for building infrastructure for better multithreading, but the big picture has warped so much that the old plans don’t apply anymore, and I’d have to spend more time planning against that new future to be able to say anything conclusive.

But what I do know is that the code I wrote for that RT Unnamed Building Game was a lot better than that of USGE. I’m really hoping to get back to UBG someday, as its scope is also a lot smaller than USGE’s; if I’d be able to keep the idea alive, yet yeet the RT things, it would be something that could realistically be shipped, and perhaps sold. Though, without RT most of the novelty and graphical appeal wears off…

I guess it’s all about managing scope; it would also be possible to ship a version of USGE with only a few months of development. It would be a technology demo, but a fully playable game nonetheless. But there’s been enough gamedev for now.

Homelab and custom auth

As told above, I had used up (almost every waking moment, I might add) of my summer holiday for learning Vulkan and RT, and there was still a lot to do. Meanwhile at work the then-current project had evaporated over the holiday, and for a moment I was left without one. This gave me the energy to continue learning, but still I faced that eventual burnout. This “opportunity” meant that I could pivot my focus at both work and at my own time to learning about Kubernetes, and forget about all the unconqueable things in ray tracing.

Plus, yet another of my long-time dreams had been to have a solid infrastructure for running self-hosted software - both of my own making, and by other people. And doing it securely. So I didn’t really mind the literal double-timing of learning new things so soon again.

And a lot of new things I learned. It took a bit of iteration, but now I have a somewhat satisfactory hierarchy of Kubernetes manifests, and a small-yet-equally-satisfactory collection of services described by those manifests. All hosted on an ebay’d tinyminimicro-sized server I bought just for this purpose. The server's awesome: it's tiny, x64, and consumes about 6 watts at idle. Pity it has only 8 GB of RAM, and doesn't have the PCI-E connector for a 10+ Gbit network card soldered in. Also, I’d still like to do the manifests over one more time - this time using Terraform for avoiding some repetition on specific parts of the infrastructure. A bit more on that in the next section.

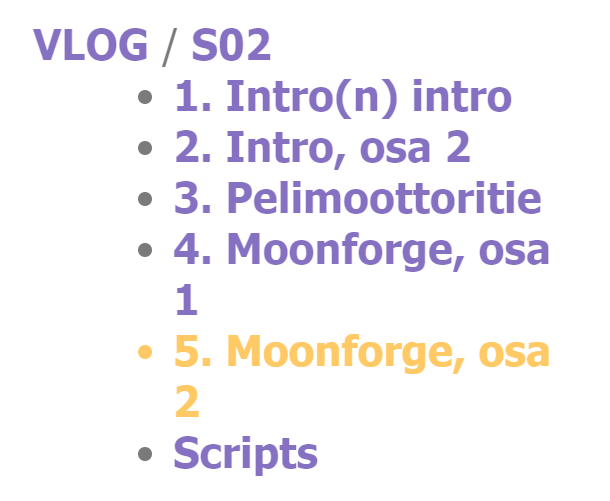
I had hoped to create a VLOG episode about all things homelab, but that didn’t happen this year. But what I instead have is a two-part special about one facet of it - namely authentication and authorization. I’ve materialized a lot of my dreams this year, and the theme continues :)

I set up a monitoring stack with Postgres, Grafana and Prometheus, and migrated some of my own server applications to the new hardware (countdowns, hometab, …). I also set up an instance of changedetection.io. All of these things benefit from unified access control in the form of single sign-on (SSO). As illustrated in the first part of the VLOG, I had initially set up Authelia for this task, but it was not to my satisfaction.

Moonforge

So I did what I do best, and made my own. While this is a bold move even by my standards, I kept things realistic by having Keycloak do the actual user authentication, and having my service continue from that. It’s called Moonforge. All it does is minting and validating JWTs based on configurable policy. There’s more information about this in the second part of the VLOG.

But in short, Authelia felt really nasty because it had a single login cookie for everything. With Moonforge, the user logs in to Keycloak, and then to Moonforge via OIDC, and afterwards to the actual applications with OIDC-like semantics, even if the applications don’t natively support it, thanks to special reverse proxying routes spanning some paths even in each application’s own domain. The JWT cookies for these logins are application-specific, and can’t be used to access other applications unless the user specifically allows it on a case-by-case basis.

I really think that having my own service for auth is for the best - as long as I haven't made a mistake in something elementary. As further detailed in the VLOG, the alternatives are just not that appealing. Authelia requires me to fully trust the applications it protects, and standalone Keycloak is too complex to configure: I’m bound to make a mistake. If I build my own, I know for sure how to configure it. And since I’ve been doing backend stuff for a long time, I hope for everyone’s sake that I’ve learned to build a simple one that is reasonably secure. After all, the harder parts are still done by Keycloak - for now. And I’ve already spent enough time looking for ready-made solutions.

Besides, having an auth(n|z) solution of my own has been yet another long-time aspiration. I think I did some initial UI planning as far back as 2015, and it took until now to implement a system. It looks nothing like originally envisioned, but that is partly due to how the focus so far has been on authz instead of authn. Plus, I haven’t really decided whether I want to let it have its own visual identity, or whether to have a more standardized appearance around my core css.

While the visual identity is a definite nice-to-have, the actual technology behind the scenes is what it’s really all about. In its current form it replaces Authelia with something more secure, without offering much more than that. The foundation I’ve built everything on feels really solid and well grounded. The cookie paths and domain are sensible, and there’s been effort in building everything with a focus on security. There’s extra care in JWT validation, and things like embedded keys and alternative signature algorithms have been explicitly disabled - strange how some JWT libraries don’t even have the option to disable these features. And the small scope has definitely helped.

As I’ve mentioned many times now, for a project of this scope, having Keycloak be part of it is sensible. But I’m hoping to find the time to replace it with my own implementation. When I was still working on Tracker, I implemented a login flow similar to how for example WhatsApp Web works now. That type of passwordless flow was really nice, and I’ve wanted to replicate it in a more generic setting, while also adding some other security features. Hence the dream. In the VLOG I talk about all the things I’d like to add and how they’d strengthen the security of all the services relying on the system - pushing more and more of the auth functionality on to better trusted companion devices, outside the device and the server the login is being performed on. There's also plans to harden the surface which mints the JWTs by requiring input from a trusted device. I’d also like to get hands-on experience interfacing with security keys such as Yubikeys.

Moonforge is far from being feature-complete, but it’s perfectly serviceable for its current task. I feel good, and with that 'final part of the 1st stage' of my Kubernetes infrastructure implemented, I now have what I wanted: a stable foundation for hosting and building self-hosted services and applications. Next up is Terraform, better uptime monitoring, perhaps distributed logging and most importantly improved machine-to-machine authentication. And maybe even making more VLOGs on the topic.

Terraform, cloud and static HTML generation

With the things at home looking so good now, why stop there? The next thing I could be improving is my (still perfectly functioning) decade+ old homepage. The current site is hosted on a single server, and the PHP in it dynamically serves WikiCreole-based content. I’ve been meaning to replace it for the past two years with static generation and geo-replicated hosting, but the time hasn’t been ripe. Except now*.

There’s been demand at work to learn more about the cloud, and I was able to use this to my advantage. I was required to set up a static website on AWS S3 and CloudFront, so why not use what I learned for the new site? And while at it, why not do it properly. This is again a topic that would have made a great VLOG episode or a post of its own, but I’ll try to be brief.

At work I was given Terraform to accomplish the task, and I quickly fell in love with it. It allows for writing all the infrastructure as “code”, a bit similiar to how Kubernetes manifests work; precise and to some degree self-documenting. And making changes is easy, as the user doesn’t have to know the exact commands, they only need to tell how they want the end result to look like. It’s a really nice way to work.

The best advanced feature of Terraform are the “modules”, which allow for defining complex reusable components, which in turn expand to a set of simpler pieces of infrastructure. While that’s an overkill for just a single static website, I’m looking forward to migrating all(?) my Kubernetes manifests to Terraform. While raw manifests are mostly fine, the biggest pain point for me has been in defining firewall rules and HTTP(S) ingresses. These are very verbose, and contain a lot of dupliction between each other. With Terraform I should be able to write a single custom utu_http_ingress module, which defines all those at once. There’s also some special additions that need to be done to each Traefik (the reverse proxy) HTTP ingress route entry in order to support the special login paths needed by Moonforge - having the module transparently do this in a centrally defined location is awesome.

With the basic infra up, the more fun part was uploading the content. I could have used some type of shell script and aws-cli to upload the site content, but it turned out to be really easy to use the SDK and build my own program. With it I could easily incorporate some extra steps, such as only uploading the files that have been changed / renamed between each run, and more importantly transforming the uploaded filenames and paths. The static site generator includes the .html file extension on all content, and I was trivially able to remove that. There was also some special logic on how “index” pages and paths worked with the PHP site, and I was able to take that into account, too.

And lastly, I learned that CloudFront is able to compress the content it serves, but this feature depends on the file types and the available CPU time on each edge server. The only way I can ensure that the content is always served compressed is to save it pre-compressed to S3, and then return Content-Encoding header with the correct value for each request. But now that I control the upload process, this was no problem :)

And speaking of content, that’s a topic for another post, again. A few years back I stumbled on statiq, and found it to be the least-sucking tool in the .NET world, so that’s what I chose and started to slowly port over the site itself, and the content. Instead of WikiCreole and PHP I had Markdown and C# HTML compiled down to plain HTML.

With this new technology stack I could also accomplish some of my long-time desires for ever so slightly improving content-discoverability on the site. Along with the old stuff, the site also serves as the companion for my VLOG, containing the scripts, some technical specs and other commentary on each episode. I wanted to make it easier to move between different episodes and projects, so I implemented a sidebar navigator for this.


Site generation in statiq is a multi-stage process, with one of the stages being content discovery and “front-matter” parsing. This way each page knows what other pages exist, and I’m able to pull similar pages from the metadata to the sidebar - either by the folder structure, or by a special grouping key. This metadata is also used to build navigation breadcrumbs.

*The tool still sucks, though. It tries so hard, but fails. There’s a live-reload server for avoiding full rebuilds when working on individual pages and templates, and a caching system so that those full rebuilds can be avoided also when publishing. Unfortunately, both have been broken for several years. The live reload server needs to be restarted whenever a page containing an error is opened (so don’t save a live-reload page until the code compiles!), and the caching system doesn’t purge the metadata cache, so pages appear multiple times in it, breaking the sidebar.

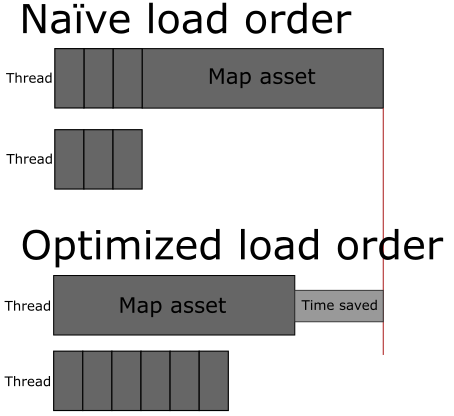
I was going to sidestep all that by making a hot-reload system of my own, by building on the “hot” reload technology I invented for USGE and UBG and UBG's asset pipeline. Newer dotnet supports unloadable assemblies once again, so it’s possible to keep the compiler and dependencies loaded in memory, but still dynamically reload all the user code - a sub-second operation. That way I could delete the cache between rounds, and avoid the server dying whenever an error occurs, by simply very quickly restarting it after each run instead. Unfortunately statiq always starts a text-based debug console meant for live-reload even when not using it, and never cleans it when exiting, thereby failing to run again in the same process. The relatively complex code which does some high-level orchestration of the generator is rather tightly coupled with the code controlling the debug console, so it’s not an easy task to separate these two. Even cleaning up afterwards is not trivial. FML.

Despite this, the preview for the new site is live, and the DX is a bit better than before. And it’ll get better, won’t it? And if not, I’ll just have to make my own generator. There’s still work to be done in upgrading imagepaste, perhaps the contact form, and transferring over some other static content. I’d also like to improve the page load latency, so I’ll have to find a way to cache the CSS file, yet reliably invalidate it without rebuilding the whole static site. That might be impossible to do without scripting. But for now, at least the primary content has been migrated succesfully.

Minecraft and Lua

It’s been a tight year, and I wanted to take my mind off other things, so I found myself gravitating towards modded Minecraft once again. Plus, it’s just so damn addictive it’s hard to keep away for too long.

This time I’ve been playing Create: Above and Beyond, a non-expert modpack with strong progression. The focus is on Create, a “low-tech” automation mod, which has large moving machinery which in my opinion fits the theme of Mincraft really well. As the technology level keeps increasing over the playthrough, some products benefit from automating them with programmable in-game computers. It’s also fun to monitor some production chains, such as the amount of charcoal fuel.


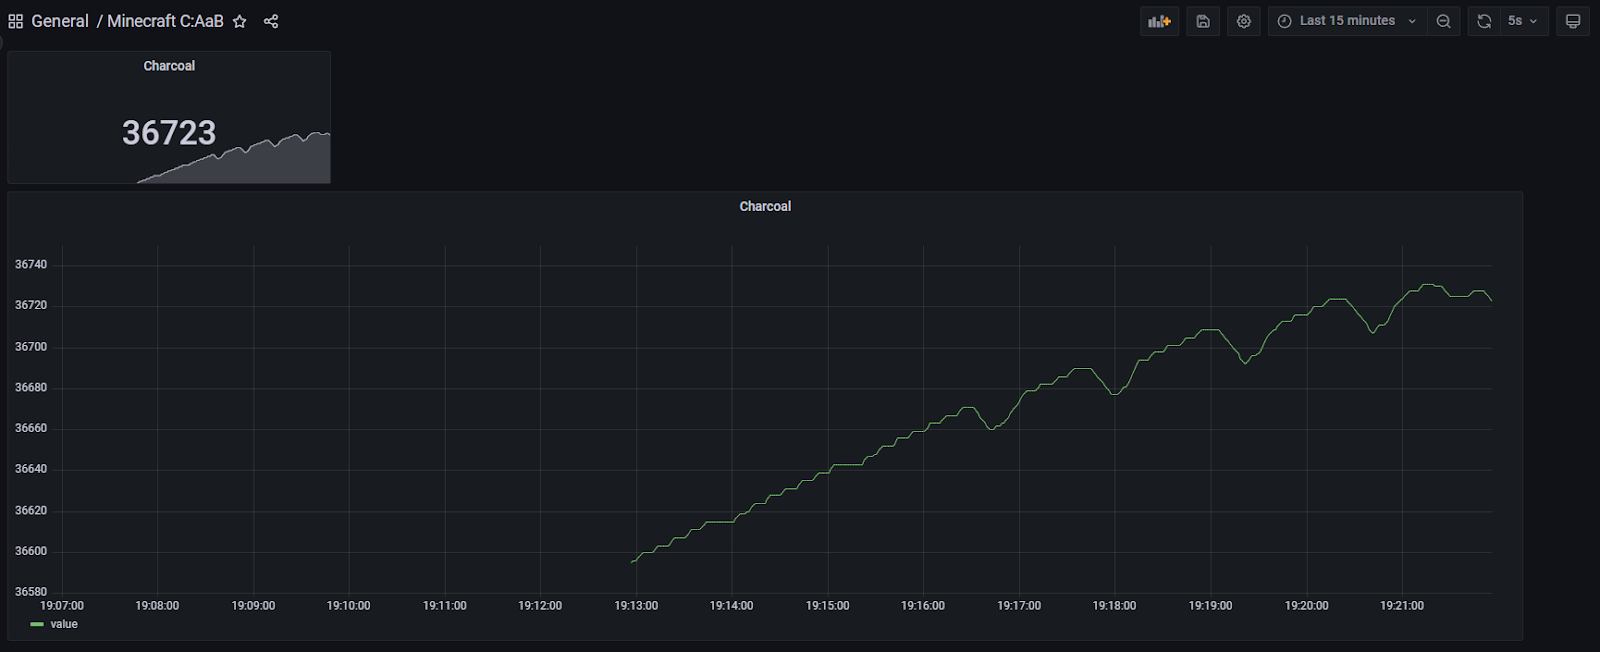
Few years ago I already built some libraries for saving metrics to Postgres (with plans to migrate to TimescaleDB), so this time I was able to build an in-game Lua program, a metrics gateway server and a Grafana dashboard in two short hours :) This was a good primer for the more complex factory-controlling programs.

While the modpack is heavily focused on doing things with just Create, some things would get needlessly complicated when done with just in-world redstone circuits. Just like I really enjoyed describing infrastructure with Terraform, I also enjoyed avoiding complex circuits with Lua code. It’s a lot more self-documenting, and the code itself is creeper-proof :p Some might argue that the beauty of the game is using those simpler primitives for achieving the end goal, but at some point it just becomes plain frustrating. Though in this case I’m not very good with Lua, and I’m not even trying to be: I know the bare minimum, and use that to make the programs. I guess that’s my way of playing the same game.

And as it was beautifully noted to me, I guess I’m in the right industry when even relaxing and playing video games leads me back to writing code. Or alternatively, I’m just a sick and troubled mind, which can’t ever truly let go and just relax (:

Closing words

Whoa. It seems I’ve been really active this year. Maybe too much so. But, for now my only real regret is that I haven’t documented my doings even better. This post ended up a lot longer than I first anticipated trying to cover even the majority of what I’ve done. Especially the gamedev things. But at least I have something to show for it, and I did at least try with Twitter.

Thanks for reading! If you are - for some strange reason - after for even more to read, can I recommend you the 15 year anniversary post of the blog. It’s a lot shorter, I promise!

PS. I’m also working on a little something to highlight all the wonderful private code commits of mine, and also my other online doings in a central place. Stay tuned.

UBG: Vulkan and hardware ray tracing

Exciting news! In an earlier post I described my conflict with doing stuff and having something to show for it. Well, it seems that I managed to get over it - at least partly. The past 1.5 months or so I've been rather busy learning Vulkan and hardware ray tracing, and have gotten rather far already!
Though this time I had a bit of help. Instead of doing everything from scratch, I decided to build upon the assets of a Finnish Game Jam 2015 game I was part of, WatDo. Btw, that year was a bit special. I didn't code a single line of (game) code, focusing solely on building the game tilemap with Tiled. Anyway - let's start by briefly talking about doing the new things, and then about the things themselves: learning Vulkan and RT, and also other engine-level stuff such as asset loading and abstractions.

I got inspired (more on a later post?) to finally build my other long-time dream - a game with dynamic 2D soft shadows and diffuse global illumination. Considering everything, I thought that my best bet was to learn hardware ray tracing, which in turn meant learning Vulkan. I had zero knowledge on RT, but I had meant to learn Vulkan on many occasions, as that is a modern high-performance graphics API with many improvements compared to even most modern OpenGL. Especially in the area of multithreading, which is a major focus area on my new "engine" in USGE. I was still rather sceptical of RT, but decided to move on with learning Vulkan first, as that was the pre-requisite and would be very useful by just itself, too.

Learning Vulkan

As I knew very little, it was easy to just start working through a tutorial, and having the tutorial to speak for itself. And for the longest time there even wasn't anything that could have be shared, as it was all just initialization and more initialization. In the end it took me two weeks to complete the tutorial and have a multisampled and textured triangle on the screen.

Quite a pleasant surprise, actually. A long time ago when I initially stumbled upon Vulkan and that very same tutorial, I estimated that it would take at least a month or two to complete it! And now I finished it in just two weeks! I even managed to backport my code hot reloading system, and with the new explicit APIs of Vulkan (and my own GLFW windowing code), it was slightly easier to accomplish it than with USGE which used OpenGL and Silk.NET.Windowing. Of course the initial discovery work done on the topic was extremely important; I'm hoping to share some details on a VLOG post later. But no promises.

The tutorial I used was perhaps intentionally focused on NOT building abstractions on top of the Vulkan functionalities, so after I finished the tutorial I slowly began building those missing pieces for the most common functionalities, concurrently with learning new stuff. But with an asterisk. I intentionally tried not to abstract too many things, as I still know very little about Vulkan and the use cases. I've also read too many horror stories on just building engine abstractions and losing all will to continue after that work is "done". And in the olden times that's exactly how I rolled, and it was glorious! Cool stuff can be done even without great abstractions, to a point. So let's do just that and see where we end up. Especially when there are some rather major engine-level things I'm yet to do (and don't yet know how to best to them), and all those can affects things by a lot.

Learning ray tracing

Confident in my abilities and the success with Vulkan, I started learning about ray tracing. A task I was expecting to fail. But after reading a few papers and watching a couple of videos on the topic, I managed to astonish myself even more. It took me only a week to produce an image containing ray traced elements, and that's on top of the work spent on tilemap rendering stuff. Some of the more helpful videos were:
But three weeks. For learning Vulkan and ray tracing from scratch. I'm extremely happy for such and accomplishment.

And at this point I was eager to publish something, too! Something small. But shooting a whole VLOG post still felt a daunting task, and even writing a blog post would have been too much. But a microblog was the right size, so I tweeted about my accomplishments :)

I continued working on RT at a great pace, and and shared a few more images on Twitter in a short timeframe. The images also deserved some kind of descriptions, so I did my best while staying inside the 260 character limit. But that felt too restrictive, and I yerned for a good old blog post. But that was too much. So I stopped posting, and turned my full attention to just doing stuff.

And just kept on doing stuff. While the initial ray traced images were easy to produce, further improvements were increasingly harder. At some point I finally managed to decide that RT things had reached a checkpoint, and I could / should / had to work on some other areas for a change.

The final upgrades were about adding glowing things on the map, and the process of producing the final map meshes was taking longer than I was happy with. Short iteration time is my thing, and now it was broken. But hope was not lost, no way.

Porting the asset system

For the previous iteration of my "unicorn" game project USGE, I had produced an asset pipe system which handled asset loading and metadata, and generated an Android-inspired R-file. The system was also meant to do initial asset pre-processing automatically, but I hadn't gotten around to implementing it just yet. And now I clearly needed it, so I got to work.

I started by drafting a fluent API for configuring such a processing pipeline, while on a train. But when I got to implementing it, I encountered something shameful. While I've started to feel confident in my own programming abilities, the type of object-oriented principles and especially the soup of generic constraints needed to implement the API in a compile-time safe way eventually proved to be too difficult :( Or at least in that state of mind I didn't manage to finish it. So I took a step back and implemented the configuration API in a way that was completely validated only at runtime, and got the stuff done at least. A great psychological win, actually.

In the end I now have a system where I have a bunch of .meta.json files in the assets directry. They contain pipeline configs and references to concrete files. The pipelines themselves can then transform the definitions and loaded assets, and finally produce a set of asset definitions and data files for the game to load. And the R file plus an accompanying asset manifest.

In the previous iteration I had all the metadata codegen'd into the R-file, but that was so much work. So now that metadata lives the manifest file which is read at an early phase in application startup. The manifest itself mostly just contains file names for each asset, but can also contain special instructions for the asset loaders (like precomputed image sizes). But mostly it contains stuff required during development for asset "hot-hot" reloading (yet to be implemented).

The asset loaders themselves work in parallel most of the time and use the manifest to know what to load. For example in case of the textures:
  • Allocate Vulkan image handles and get memory requirements; pixel size known via manifest (currently non-threaded, but rather easy to improve).
  • Allocate one large buffer for image data.
  • Load all images in parallel from disk (or later on, from memory). This includes IO, parsing, GPU uploads and mipmap generation.
  • Cleanup staging buffers.
Asset loading is especially a thing where I'm most satisfied with Vulkan's multithreading support. Things just work out of the box, no magic required.

Oh, and all the different types of assets are loaded in parallel, too. The loading order is guided by the manifest. It doesn't typically matter, but profiling showed that map data took a lot longer to load than any other asset, so I implemented a special configuration option to enable marking some assets as "Expensive". They are loaded first, meaning that I save about 20ms of loading time with that simple change. The very first loader thread starts to load the map, and while that is happening all the other parallel threads manage to finish their work. If on the other hand the other assets were loaded first, they could finish loading a bit faster, but we'd end up waiting for the big asset for a lot longer:
There's a lot of things I could improve with the asset system, but for now it is good enough allowing me to focus on other things.

Other load time improvements

While the load times were the driving reason of the asset system, the system of course also has its primary use :p But performance is a nice focus area. And in parallel to working with the finishing touches on the assets, I also worked to improve other things which impact the loading times. As I briefly mentioned, I've build a hot-reload system for code. When the game host starts, it creates the desktop window and sets up the Vulkan context. Then it dynamically loads the game's assemblies and executes the code. When a change is detected, the same window is reused, and the code is reloaded. Initially the host was not aware of the assets, but I've since improved things, allowing me to cache the them.

Also, I managed to improve the reload process in the host by parallelizing assembly reloading, Vulkan context recycling (not required, but helps to point out resource leaks) and asset manifest processing. This alone saved me about 300ms.

Currently the asset caching is limited to just the file data, but even that yielded an improvement of about 100-200 ms. The rather unoptimized map asset is 150 MB, and sadly takes a while to load from even an NVMe disk. But by caching the data in the host, that can be skipped. Thanks to the checksums built into the manifest, the host needs to re-read only the files which have been changed between reloads. When the game code itself runs, it can use the data from memory, skipping the disk reads. As a final tiny optimization the cached asset data is allocated in long-lived pinned arrays, hopefully reducing the GC pressure by just a tiny bit.

I'd like to improve things by a notch more by having the host keep the textures themselves in memory, but currently it's actually not worth it, as the multithreaded loading is already fast. Plus it would greatly complicate recycling that Vulkan context. The slowest asset was the map data, and now it's fast thanks to being cached. So now all the assets are loaded in about 50-100ms via the cache.

After the assets (including shader binaries) have been loaded, the game can concurrently compile graphics and ray tracing pipelines (latter taking 250ms even with a pipeline cache!) and building the initial ray tracing acceleration structures. And after just the pipelines the game can also start to initialize (later on with even more threading) all the game objects while waiting for the AS build.

In the future I could further optimize things by starting to build the AS immediately once the map asset is loaded (before textures), and also the pipelines could start compiling right after the required shader bytecodes are loaded. But at this point I deemed best not to complicate things too much. Oh, and of course I'm yet to optimize the map mesh itself. There's A LOT of shapes that could be merged. There's also no index buffer yet.

Probably forgot something, but with all these changes I managed to cut the total reloading time from almost 4 seconds down to about 600 ms, so it's almost instant again. The initial load takes about 2.6 seconds, but thankfully that needs to happen only rarely. So about 1 - 1.5 seconds from pressing "Build" in Visual Studio to reloading all game code and assets and getting the first new frames on the screen :)

It's a joy to develop with an iteration time that short.

Further RT work

With the basics in check once again, I delved to another must-have feature: ray tracing denoising. Initially I tried to do my own filtering and got surprisingly close in building a pseudo k-nearest filter, but the performance was awful. When I later read more about the techniques it seems that I was very close to how the things should be done properly. Instead of having and adaptive window size in a single pass, multiple smaller passes should be made.

After giving up on implementing my own filter I managed to gather enough courage in trying out Nvidia's Optix denoiser. That unfortunately was only available via their driver, and required using their C++ SDK. Before committing to it fully, I did some manual work with their command line sample. Exported some frames from my game, converted them to EXR, ran the denoiser, and converted the files back to PNG. And it all looked rather promising!

Then, to my astonishment, I managed to build a C DLL wrapping the functionality, and integrate that to my game. The performance sucked due to expensive buffer copies via CPU, but I could see denoised stuff, and it all looked correct! That was most excellent. Then I spent a few days optimizing the buffer copies, eventually managing to share the Vulkan's buffer directly with CUDA's thanks to VK_KHR_external_memory_win32 and cuImportExternalMemory. I still have one more smaller buffer to skip the copy on, but on a 1200x1000 R32G32B32(A32 unused) buffer the denoising process now takes about 4 - 5 ms on my RTX 3080 Ti. That's still a bit slow, but perfectly usable!

Unfortunately the high frame rates allowed me to see that even in Optix's temporal mode there's considerable variance between frames because I just don't have enough good samples per pixel. Only at about 64 spp is where things even begin to look passable. 1 - 2 spp is the generally agreed upon good target...

I had hoped that I wouldn't need to implement importance sampling in a game this simple, but seems that I was wrong. I was victorious with Vulkan and the basics of RT, but I fear that is a battle I might not be able to win. It was nice knowing you all.

Next I'll be researching ReSTIR, DDGI techniques and the like. Just wanted to write this advance-eulogy first.

* * *

But perhaps not all is lost. I mentioned having some success with my own denoiser. I should also try the AMD's open source one for comparison. Or perhaps try writing a special version combining that with my own. While it might sound a bit arrogant even trying to write my own which is better than even the state-of-the-art by industry leaders, there's one thing on my side: I haven't yet spoken about this in depth, but I'm not trying to ray trace the whole image; just lighting. Once I have the ray traced per-frame lightmap, I can then render the game objects with a normal rasterizer, and look up the lighting from the smoothed out RT image. For example the rather distored yellow grids in the image at the start of this post are of no concern, as a separate raster step will draw over them.

Oh, almost forgot. I've spent extra effort in making the ray tracing happen in a real 2D-space. But if I want to truly simulate how light would behave, I must do it in 3D, and have all the game objects have a 3D representation: in real life if a light beam hits a floor, some photons bounce to the ceiling and the walls, and then back to another point on the floor. That isn't currently happening, leading to light beams that don't illuminate rooms the way they should. It might be possible to do some post processing to simulate it, but I'm not too hopeful. "Fun" times ahead.

Anyway. Quite an update. I really hope to be able to return victorious some day.

Adventures in making a .NET IoT timer with Meadow

Despite the hardships I described in the previous post I’ve managed to produce something. Something rather cool! While I’d like to present it in video form, I’m just not feeling up for it. Blog texts are more my medium, anyway. Or maybe it’s that I have more than ten years of experience with this; can’t say the same about video :d

Anyway. A brief summary before embarking on this adventure: I made an internet connected timer display! On a microcontroller! With little previous experience. With .NET! Started with a dirty “MVP”, and then focused on improving the stability until I was satisfied. Next step would be to add more features on this rather solid foundation and improve the form-factor. See a short clip about it! There's also a clip about an early version.

This is a relatively small project, but I have a lot to tell! Writing this all must have taken at least a dozen hours or so. Maybe even more :o

Background

To prepare for this adventure, let’s first take a step back and start from the beginning with some background, as usual. Feel free to skip to the next section at your leisure, or even the one following it.

Eons ago I implemented a JavaScript-based countdown timer. It started as a pizza timer and initially saw most use at small LAN parties, and due to the convenience I’ve also used it for other foods too :p But it could have been even more convenient! So, I added a shortcut for it to my Runner, which is a Win-R replacement with strong customization. After this I could launch it just by pressing Win-Q and typing cd 12, and this would open the timer page in browser and set it to count down from 12 minutes with the query string. How easy is that!

But sometimes there’s a need to also count to a specific point in time. So, I added a command for it. at 12:10 would open the timer, and set the remaining time in such a way that it would trigger at that given time. This opened up a lot more possibilities for use, and it often was the case that I had several timers running at once. And more than once some of those timers were set for longer times, and I happened to restart my PC during them. Let’s just say that a dumb browser-based countdown isn’t quite compatible with that concept. Not to mention the times when Chrome updates prevented the timer for accessing audio due to low user engagement. Thank god there was a group policy to fix that. It was also a bit of a bother to either keep the tab active, or constantly take a peek to see how much time there was remaining. I could have moved the timer to a second monitor, but it would have required extra effort. If I even had a second monitor, that is. A single ultrawide is more of my thing.

A plan forms

I needed something better. Something which provided that durability and reliability, with the “ergonomics” being a still-important secondary feature. And with the alarms tied to specific instants in time instead of arbitrary durations. I considered my options, and saw two clear options. Either a Windows application with automatic start and a screen overlay, or something that I could run on a smaller embedded device like the Raspberry Pi. This second option would then need some kind of API to interface with it from the desktop and extra hardware to enable sound and the display.

The second option was superior in the sense that it would function independently of the main desktop, and the platform would likely have fewer interruptions due to reboots etc. But that extra hardware was quite an issue. But in this I also saw a third option. A true embedded device. Something where I wouldn’t even have to concern myself with OS level stuff like getting my app to start automatically and staying running. And I was already in possession of suitable hardware, and now software, too.

This third option is of course the Meadow F7 device from Wilderness Labs, which I owned two (now four). Some time ago it had received an update which enabled the built-in Wi-Fi hardware allowing it to be easily connected, and I already had the other extra hardware that was required from the accompanying Founder’s edition “Hack Kit” and an Adafruit order, namely the displays and a buzzer. 

The microcontroller form-factor also offers advantages with size and (perceived) reliability, with restarts happening quicky. At least once there’s AOT… And most importantly, I wanted to do things on a microcontroller. Maybe I could event have the device battery powered some day? So that’s what I set out to build with.

And boy, did I build a fine thing in the end ^^

Concept validation

Few years back I had already played around a bit with the Meadow, and built for example a code breaking game with almost the same exact hardware, so I had a pretty good idea how to approach this particular problem. The functionality itself was rather simple, both logic- and hardware-wise. Initially.

Another goal I had was that the device itself wouldn’t have any human interface. Everything would still be driven through the Runner for superior usability, and as such the device would have to be connected to the control server either via IP or a serial connection. I already had some experience with the serial connections, but IP is always so much cooler, and also more standalone in this case.

And as a bonus, I wanted to have the ability to have alarms displayed on multiple devices at once. That way I could have one on my desk, another in kitchen etc.

So, I started by proving that the device would indeed be able to communicate over IP as advertised, and that it would also retain that ability over longer periods. I took the provided Wi-Fi sample code as my starting point and got to work.

I was quite pleased that the sample worked unchanged (not counting network configs). Could it really be this simple? Encouraged by my success, I moved on to the next phase, and quickly implemented a relatively simple .NET 6 based backend for all my timing needs, accompanied with a HTTP wrapper for making requests on the backend.

But I still had scepticism regarding the networking in Meadow. On the other hand, I’ve often struggled with trying to build things that are too perfect too soon, so this time I settled for the “bare” minimum and just rolled with it. I didn’t bother to implement persistence, opting to just store things in memory. This wasn’t a lot better than just having the things in a browser, but at least it was magnitudes better than keeping the stuff only inside Meadow’s memory. I could always add the persistence layer when the more uncertain things were less uncertain.

Unfortunately, my initial scepticism was confirmed. When I got even slightly more serious about my use of the network, the device just hung. Sometimes this happened within a minute of boot, and sometimes took more than an hour. That wasn’t great. Not great at all. But hey, the device is still in beta, and the people working on the device assured me that stability improvements were actively being worked on. And they were later fixed!

As explained, getting the thing to work wasn’t the end goal. Getting them to work reliably was. On any other week I would have probably been quite devastated when something this elementary wasn’t working as expected. But now I embraced the challenge presented. I even had a secret new tool at my disposal now. One I had been itching to apply somewhere.

Implementation

A while ago the hardware watchdog in the device was exposed for use. While not exactly graceful, it was perfectly effective in getting the device to recover. Challenge overcome. How unexpectedly anticlimactic. Additionally, a later firmware update greatly improved network stability.

Now I had more time to focus on the application domain, then. I needed two things. First, I’d obviously have to get the timers to the device. And second, a closely related mandatory reliability feature is getting the device to recover those timers on booting. Something that would happen quite often for the foreseeable future.

Luckily this was something I had anticipated with the initial architecture, and almost the sole reason the server component even exists. While I didn’t set out to build perfect right away, it had to be better than just persisting the timers in the device’s RAM. Especially this early in development I assessed that the server would have a lot less restarts than the device, and it wouldn’t make sense in trying to persist anything important on the device.

Or at least I didn’t know enough about embedded hardware to know how reliable it is. All I know is that SSDs on PCs are quite reliable. And a magnitude more reliable yet if the server is clustered over many physical computers and the writes go to multiple independent storage devices. But that’s another adventure altogether, best embarked some other year.

MVP

Let’s talk about the APIs first. Respecting the pledge I made to myself earlier, I started by building something less desirable, but what would work with minimal work. And what’s easier than polling over HTTP?

No state-keeping, no events, just a dumb endpoint that returned the next countdown timer. And as I wasn’t familiar with the characteristics of the device’s clock and its accuracy, I made the endpoint also return the current time. The device could then compute the exact current time by diffing to a stopwatch which was reset when the endpoint polled.

And there I had it! Thanks to the code breaker project, it didn’t take long to have the remaining time visible on a 7-segment display, and the end of the timer visualized by flashing a Charlieplex led matrix. A fully functional MVP already.

Ending up with a viable end result is rather unheard of, as far as my things go. As hinted, usually my projects are very long and I aim for the perfect. Sure, I’ve learned a lot doing it, but only rarely managed to produce an artifact, and of any real use. And that I had something again, it felt really good! I had really missed the feeling.

Further improvements

Now that I had a minimum viable product, I could have just ended it there. But it’s just not in my nature. I had already put a week of work into it. What if I put in another? I could do so many nice incremental improvements, and all the time have a working thing. Even if I quit, I’m left with something worthwhile. Plus, I was feeling good. I really wanted to keep working on it. Even if my fascination got a bit unhealthy towards the end of the first week. Surprised myself by taking a short break, and was again energized.

And there’s a lot I ended up improving. I’m not sure how I should best present everything, so here comes something. It doesn’t have to be perfect, right?

Networking

The first obvious improvement was how the device interfaced with the server. If you recall, the first implementation was simple HTTP polling. Polling has high latency, and this was something that needed instant feedback in order to feel reliable. If I set a timer, I want to immediately see that it got set and move on to do more important things.

I could have upgraded to long polling and call it a day, but publish/subscribe is a lot cooler. Plus, it’s more efficient and scales better, not that it was an actual concern. While I’ve tried to make NATS my go-to in this regard, I decided to go with another of my favorites: Redis. It’s a mature codebase, and the wire protocol is dead simple, so it’s going to perform extremely well for my scenario.

Except it didn’t. I tried using the de-facto StackExce.Redis package, but it turned out to have too many features. Meadow executes code in an interpreted mode with some rather primitive JIT, and all those features with a complex handshake meant that the initial connection took a long time, enough to blow past about every conceivable timeout. Even five minutes wasn’t enough to complete the whole handshake. That was just too much.

I could have tried NATS yet, but decided to play it safe and go for the nearly polar opposite. And have a chance at doing something I had been missing a long time. Pure UDP. Minimal framing. Dead-simple connectionless protocol with timers. Handcrafted packets. Oh, how I had missed that world; it has been so long since I had worked with Tracker.

And third time’s the charm. Performance was awesome and things just worked. And would they happened to not have worked, timers would soon rectify the situation. I was happy.

There are just two packet types. The device sends discovery packets at an interval to the server, and the server sends status packets at an interval to all devices which have been discovered. And if there’s a new alarm, the status packet is sent immediately, allowing the device to pick up the countdown without delay. Sure, it was excessively chatty when there were no updates, but it was also excessively simple and reliable.

The discovery packet is just a simple sequence of “magic” bytes, and that’s it. The status packet is more sophisticated. Mirroring how the HTTP polling endpoint worked, it contains a sequence of the next few upcoming countdowns which the device hasn’t yet finished. Additionally, the packet starts with a hash of the data it represents. The data doesn’t change until the old alarm passes, or a new one gets inserted before it. This means that the client can simply check those initial bytes of the packet for the hash, and stop parsing if it equals to the old hash. Only if the hash differs is it required to continue parsing and possibly allocating memory. So fast! Other than that, there’s really nothing extra. Not even a header or a real checksum to differentiate the status packets from garbage :s There probably should be…

But even with an implementation of this level things work really well.

Part of the equation is that the device tells the server that it has received a countdown, or that it has started/finished alerting it. This still happens via HTTP. While it would be nice that there was only one communication channel, one could also ask why? Right tool for the job, and it already worked well. And the device is plenty powerful to contain code for both. Everything doesn’t have to be absolutely perfect. That’s what I actively try to tell myself, and I’m slowly starting to perhaps even believe it.

There’s also a mechanism for keeping the device’s time closely matching the server’s. Initially, I thought I’d implement NTP. But I don’t really understand it, and I could not find a good implementation I could run on the device. So, I rolled my own (:

When the device boots, it simply does a HTTP call and uses that time. And afterwards every 15 minutes it asks for the time again. In case the call takes less than a threshold, the device’s time is updated, after tweaking the time value by half of the request latency. Because why not. It’s likely mostly symmetric on a LAN, right?

It works really well. If I wanted to improve this, I would eliminate the explicit updates completely, or at least implement them in UDP, so that there’s always only one round-trip required, improving latency. Not that the current 60-100ms is too bad. It should be using keep-alives, anyway, so there’s not too many extra packets. Elimination of these updates could be achieved if the server immediately replied to the discovery packets with status and time. And perhaps have some soft nudging so that the device’s time changes by only a few milliseconds at a time if the difference isn’t too large. That way the remaining time on the countdown display decrements as expected even under close observation.

Local persistence

Now that the protocol was at a satisfactory level, I could continue to improve other things related to reliability. Which still happened to be related to networking, too. As explained, the way the device protocol works is that the server sends the “next” events to the device. For the server to know what these next events are, it needs to know if the device has already alerted them: the device needs to tell the server this. But the network can be unreliable, and I don’t want to bother the user with duplicated alarms in case where an alarm happens but the server can’t be reached before the device boots.

So obviously the device needs to be able to locally persist these states and then ignore them if the server disagrees, and resend the state update. But how to store this data? While Meadow does have onboard flash storage which is accessible to user code, I’m concerned with write endurance. State updates can happen relatively often, so it might wear out the device at a surprising rate.

But there’s alternatives! I’ve been fascinated by write endurance before, and happened to stumble upon a type of memory which is persistent without power, yet having a superior write endurance compared to flash, while being relatively affordable and usable in embedded devices. As a part of Adafruit order I got a couple FRAM (Ferroelectric RAM) modules for unrelated purposes. These particular modules have write endurance of about 10e12 per byte. While still finite, it’s practically infinite in this application. How cool is that!

There was no ready-made library for using the modules with Meadow, so I ended up writing my own based on Adafruit’s Arduino code. Things went quite smoothly – after I learned that the chip select pin can’t be released between sending a command and reading the result. Oh, and there was also another thing. This particular device requires sending a separate write enable command before the actual write command. Adafruit’s library insists that the write enable command needs to be sent once, and then multiple writes can be issued. But reading the datasheet the write enable latch is reset each time chip select is released, and a new write command can’t be issued without releasing the pin. Was a bit frustrating to figure that out. Or at least I couldn’t figure out how it was supposed to happen. This was my first time interfacing with an SPI device, after all.

Now that I had the storage device, I could get to writing things to it. I ended up with something relatively straightforward. The persisted data consists of “packets” of constant size, and each having a static header, countdown GUID, the latest status enum value, a serial and then a hash. Each time a new update is written, it’s written after the one before it. This way the memory gets worn relatively evenly, not that the write endurance really was a problem. But why not.

For the hash I wanted to use just a simple CRC32, but as it happens, .NET standard 2.1 doesn’t have an implementation for it, and I didn’t want an extra library just for it. But what I have is MD5. And as a bonus, it is hardware accelerated, too! As the full hash is rather excessive, I simply XOR it to shorten it.

Span<byte> hash = stackalloc byte[16];
// MD5.Create().TryComputeHash(…, hash, …)
var ints = MemoryMarshal.Cast<byte, int>(hash);
var smallHash = ints[0] ^ ints[1] ^ ints[2] ^ ints[3];

Beautiful, isn’t it.

Now with the states persisted, the device can read through the memory and try parsing a packet from each packet-sized offset. If the header and the hash match, it is assumed as valid persisted state. If multiple updates are found for a single event, the “newest” one is selected first based on the serial (a version number) and the state. Afterwards, all those states are bulk sent to the server during the startup sequence, which now once again sends relevant status updates which the device doesn’t have to ignore. This also saves a bit of network bandwidth.

Watchdog

Continuing with the reliability improvements, my next focus was improving the watchdog. The initial implementation guarded well against complete device hangs, but wasn’t not much more sophisticated than that. As the application now consisted of the time updates, the discovery stuff, the actual timing code and lastly an asynchronous bonus layer for the state updates (more about it later), it made sense to start monitoring all of them. But there’s only a single watchdog. How to watch for so many different things?

What I ended up was a collection of timestamps which record when each of those components was last healthy (=reached a checkpoint), and then a task to periodically compare those timestamps against specific timeout values. If any of the timers is deemed unhealthy, and error is printed and the watchdog is not reset. This leads to the device restarting, and usually things start to work again. As a bonus, as the timeouts are computed in “user-space”, they can be a lot longer than the default short.MaxValue milliseconds the Meadow’s watchdog makes possible. Mostly useful for the time updater.

I’ve spotted the device to restart a couple of times due to above, but I don’t have the specifics on why. There’s some kind of traceback visible on the small debug display I have attached to it, but it’s too small to display it in full. I’m considering on trying to write the tracebacks to the flash memory as they happen, and then sending them to the server after reboot, or on background. Or maybe order a lot larger display just to display the longer tracebacks :D

Usability

As I built the timer on top of the hardware I had in the code breaker, I already had a 7-segment display and a bright “lamp”. The 7-segment display was obviously for showing the time remaining, and blinking the lamp for alarming. In this case the lamp is an addressable Charlieplex led matrix display (had to make a driver for it myself, again). It’s a total overkill, as I’m just filling all the pixels with a single brightness value. But it’s easy. And really bright.

But what’s an alarm without auditory output, too. In the Hack Kit there also was a piezo speaker which was perfect for alarms when attached to a PWM port. I immediately hated how it sounded. It was perfect.

But I could do better.

I added a small beep when a new alarm was detected so that there was more feedback for entering one. A tiny thing, but a really nice one.

I figured out I could also improve the 7-segment display. This is probably a bit controversial, but this is my thing, and I can do stuff just the way I want :) The purpose the display it is to show the remaining time, but only when I’m interested in it. I found it a bit obnoxious that the seconds kept updating every second even when they didn’t really have any relevance. So, I made it so that the display only shows the seconds if there’s less than 10 minutes left. If there’s more, only the minutes are shown, with the digits reserved for seconds remaining completely dark.

The seconds remaining dark actually serves a dual purpose. The way 7-segment displays are typically driven is via a matrix, with only a single led receiving power at a time. This leads to flickering, which is especially apparent at lower brightness settings. The less illuminated areas there are on the display, the less there’s surface area for the flickering to manifest at.  During use I found that I’m highly sensitive for the flickering. The display is a small object, and if I moved my head around it felt as if the display was moving. That was not a nice feeling. The less flickering, the better.

Also, as the display is for indication and not illumination, I had used it at the lowest possible brightness setting. This helps to reduce visual fatigue when the display remains in my field of view. But as I mentioned, this was at odds with the flickering. So, as a workaround I bumped up to the highest brightness and covered the display with a dimming film. Not very elegant or flexible, but it felt like it helped, and my camera seemed to agree. It’s still nowhere near perfect, but it’s usable at least.

As there doesn’t really seem to be any 7-segment display which don’t flicker, my other options seem to be making my own (unfeasible), or using another display type. OLEDs would be great, but they might end up with burn-in. Not sure if that’s really a problem. There’s also TFTs, but I’m not sure how readable they are with their reduced brightness. I do have one TFT display (the debug one), but haven’t yet tested to render the timer on it.

Accuracy

And lastly, I focused on accuracy. As I hinted, the system supports alarms on multiple devices at once. I wanted to make sure that different devices would display the same time, and start alerting at the exact same time.

I already had the time updates with latency compensation, so most of the work was already done. What was left was to make sure that the time calculation logic was accurate, and that the code which was executed when an alarm started executes in roughly the same time on different devices. The biggest hurdle was the status updates. On a desktop it happened practically instantly, but the Meadow on Wi-Fi took considerably longer to execute the update.

I solved this by making the status updates asynchronous. The update is written to FRAM instantly, but afterwards it goes to a background queue and takes however long it takes. With automatic retries.

After these the alarms trigger about as closely as possible, even on drastically different hardware :) See the video in the intro.

About the development experience

Before (finally) concluding, I’d like to talk briefly about the developer experience. I’ve grown to be a big .NET fan, and I was ecstatic that I had the ability to stay on the platform even when targeting a microcontroller. Likely wouldn’t have targeted one if that wasn’t the case. At least not without a prototype in .NET.

And what’s even better is that Meadow has support for the full .netstandard2.1 profile, so not just some exotic device-specific framework. While I’d love to have the full .NET 5+ support I’ve heard fables of, that profile has mostly all the features I need. What this enables, is the ability to write .NET library code as usual, and have that work on the device without modifications. Including networking and async/await. The only thing I needed to add extra support for was the application-specific hardware, like the displays and the FRAM chip, but that was handled via a “device interface” with just a few methods.

All this meant that I could write the application logic in a reusable library, and then host that application on different targets with minimal code. In this case one target was obviously the Meadow, and another was LinqPad for running the code on PC. This also meant that for testing most changes I didn’t even have to deploy the code to the device (a task which takes a few minutes when also counting the startup time), and could instead locally test them on a desktop PC, taking only a few seconds to get results (including the time it took to compile the application). After testing I could finally deploy the app on the device, and it just worked. It was glorious.

Of course, testing more device-centric things wasn’t this easy, but there were only few of those things.

What’s next?

After all those improvements the device is at very good place already! The core is now very stable and I feel really confident that I will be able to rely on the device side of things.

What’s still missing is the server-side improvements. Things still are not persisted to a database on that end, and I’m running the server of the desktop, so as a whole the stability isn’t that much better than it used to be. But after I improve that aspect, things are really well all around!

The next real improvement is probably either the form-factor, or features. The device is built on a solderless breadboard with a lot of jumper wires. It takes quite a bit more space than it could. I have plans in moving the FRAM chip to a backpack, and replace the led matrix with just a led or two. The piezo should be good enough to get my attention. It’s a bit sad if I have to keep the dimming film on the display. I could have used the lower brightness in normal use, and then blink it at full power when the alarm ends, subverting the need to have separate LEDs.

Anyway. After this I won’t need the breadboard, and the whole thing then fits on a three-layer feather form factor, taking considerably less space on my desk, enabling better positioning. I’ll make a post about it when/if I get around to implementing it.

I’m also flirting with the idea of introducing strong cryptography, especially on the UDP layer as it’s stateless. While it won’t help with confidentiality considering the timing aspect of the system, it will greatly help with integrity and authenticity. It’s like an “easy” solution for ignoring garbage packets. If a packet doesn’t pass crypto, it can be ignored. And if it does, it’s probably valid application data! HTTP on the other hand is stateful and has a “strict” structure, so there’s not a realistic chance for garbage.

And maybe some new features, too. Like customizing the alerts, by allowing some countdowns to be silent, or with a different (=less annoying) tone.

And as the things happen over a rather simple API, I can futher customize the functionalities by writing orchestration code on another system. For example the at command in Runner is implemented by having it perform calculations, and then adding a countdown to a specific time. I'm also going to write a new command which cancels an existing alarm of the same type before starting a new one with the given time. Couldn't do that with the old browser-based approach, but now I can :)

I really like how this new system turned out. And while this might perhaps not sound like a lot, it really made a difference. After using this new thing for just a few days, I felt really handicapped when I had to use the old alarms for a while. The difference in usability was really astonishing!

VLOG season 2, sad progress report

As it turns out, I really did do it all over again. Including the part where I don’t really publish anything even though I really wanted to.

So far, I’ve scripted, filmed, edited and uploaded three whole episodes for the second season of the VLOG. The first episode is about the whys of the season, second more about general background about me, with the third episode finally talking more about the game project this season is to be about.

I’ve been quite satisfied with where the videos have been heading, but that’s also the problem. They are not there, yet. They are mostly just fluff, without proper content that would be useful in a broader sense.

What I would have liked to show is me building cool things, while making insightful commentary. To make matters worse, I have built cool things and thought a lot of insightful thoughts. But I’ve done it off-camera.

First: I don’t know how to efficiently present things afterwards. All those previous episodes required writing a script – a task which takes a considerable amount of time to reach the quality I’m satisfied with, and then some extra time to edit it together. I am rather awkward when I try to present things unprepared, plus it makes the editing process much more tedious.

Second: I haven’t been able to find the right mind for doing things live. Most of the time I struggle to find the energy to focus and do things. I’d rather just code in short bursts and then recharge. Or at least have the ability to do so. Sure, I may have pulled “all-dayers” all through last week coding IoT things. But if I set up the camera, I feel pressured to produce value, and be energetic in commenting the stuff I do, all the while also looking presentable. That’s a lot of extra to ask, and I just haven’t been able to do it. But I’d really like to. I even tried to make the live coding editing easier by introducing a recording pedal (tested with my recent Minecraft videos), but it’s of no use when I can’t even start due to the reasons above. (Plus, the project is so very overwhelmingly ambitious…)

So now instead of coding and providing quality content, I don’t produce anything, and feel really bad when coding things off-camera. It was supposed to be the polar opposite!

I’m sad and depressed, and I don’t know how to proceed.

Blog 15th year anniversary

Wow. Can't believe it's been 15 years already for this blog. This year additionally just happens to be a 10 year anniversary for my very own domain, too! I'm kinda forced to celebrate a little. Maybe even get a bit sentimental?

Anyway :3 How this blog started out does feel a bit cringey. I was quite young then. Also, I feel like blogging was kinda only becoming a thing then, and there were no social media in the larger sense. As such there weren't really any expectations on what a blog should or could be. At least I didn't. I mean, this blog was something that wasn't really even meant to become a thing. It was actually just kind of a fad I tried; something to perhaps practice voicing my thoughts on. How to somehow feel connected on something, just by writing things.

And I guess I really like writing things (not too often of course, as evident by the post history :p). But seeing how this blog has stood for 15 years - it's so long that I can't really even comprehend it all at once. So much has happened, yet remained unchanged, even. But I guess I feel pride, at least.

And that - barely - bridges us to the sentimental part. Or whatever this is. So what are all those things that have happened, then?

* * *

As mentioned in the intro, at the beginning the blog was an experiment. And there had to be something to experiment, platform wise. What's the point otherwise? :p So I started out by trialing a couple of self-hosted PHP-based blogging solutions, but was quickly turned away from those due to them feeling bloated, or just not the right fit for me personally. So instead I did what I always do: rolled my own. A great learning experience, but ultimately something that I grew bored of maintaining. But I still liked blogging, so to my own surprise I jumped for quite the opposite end of the spectrum, and moved my blog to Blogger. The final act of this transition was implementing an Atom feed for my old blog so that I could use Blogger to import the content. While reather unremarkable on itself, that may have been the first time that I really interfaced with another software solution to make it ingest something I made - instead of me just processing what some other piece of produced.

Blogger was about convenience. I had already learned what little there was to learn about the technical side of blogs, and it was now about just the content itself. And when I learned that I could post to Blogger using Windows Live Writer, blogging became effortless. A new blog post was literally just the matter of opening the application and clicking publish. A surprisingly welcome change when compared to my own solution, which required manual file uploads, or editing files directly on a remote server. Or perhaps I had an ugly web-based editor? But the quality of life was so much better with the new system. While I did have some grief about how much larger the page loads were on Blogger, all the other things won. With a proper theme it didn't look that much more heavier, and the dialup era had already ended.

And I guess that's all I have to tell about my history with blogging. Let's talk about the (evolution of) content next.

* * *

And boy, have I talked about a lot of things. And the initial years is something that I'd rather not really even talk about, anymore. It's like cringey Twitter. But how the blog has evolved since then, that we can talk about. Statistics-wise the first post was made a little over 15 years ago, and since then 79 other posts have followed, including this one. For a nice round total of 80 posts.

But I guess for completeness's sake I do have to address all the content. Like I mentioned above, the blog started out as something to allow me to have my own voice. At the time I wasn't (and still isn't) very social, so writing was an exciting opportunity to comment on things I had interest on: my beginner programmer stuff and other experiments with computers. Especially programming stuff, since I had very limited opportunities to talk about it otherwise. And I guess I can't deny the fact that having a blog was cool, as not too many people had one! I was hipster before you even knew it was a thing!

It also didn't take long for me to switch the language from Finnish to English. Because if I bothered to write about things, why not write about things in a language that maximized the potential audience with minimal cost?

After a time I also began experimenting with voicing some of my other experiences; how I was doing in the physical world, and after quite a bit of hesitation even about taste-testing meads. But talking about myself always felt strange, still. It was a lot easier to just talk about concrete stuff, and preferably in a way which could perhaps benefit the random reader. Value! Not that many of the posts really were that way, but that was the idea.

And value is actually maybe the most important talking point here. The blog was (and still is) my very own corner of the world, and with the only rules being the ones I make (or break :o) myself. Now, writing this I realized that the blog is a lot more me representable of me than I knew.

The most controlling aspect is the stride for just not half-assing things, but doing them well. The early tweet-like posts are especially hilighted here, because they were low in effort, and with little thought put into them: just stating a thing. Contrast this to later posts where I not only state things, but also the thoughts behind them. And better yet, explaining the things in such a way that the reader is able to hopefully learn something tangible. For example the times I talked about procedural asteroid generation or WebRTC. Or even the post venting about the instability of InfluxDB has a real tangible command to rebuild the index in a non-standard, yet common enough case.

Or to put that in other words, to create value. Why would anyone want to read this blog if it was just me talking about myself, on a surface level? When I could feel like an VIP and be talking about things that could benefit people. I've never even tried to chase readership numbers, but it does feel awfully nice to see that some posts have had up to 500 views. For some strange reason.

But like in real life, there are the extremely rare cases where I realize that the only one stopping me is myself. Times when I get to post about tasting those meads, or how a video game hit me really hard. Though even all those posts are still subject to my strict requirements of avoiding the "air-headed" beginnings and having some real thought behind them. Especially those posts, it seems. And this one, to a point.

* * *

Did I mean to talk about summarizing past post? I'll keep it short, then. It's high time for this post to start giving out some value :d

  • 2006: Short posts about developing a primitive blogging system with PHP. First comments around Linux experimentation. First post about my game project, USG.
  • 2007: Mostly a continuation of the previous year. A one-off comment about tech news.
  • 2008: More short commentaries about dev stuff. Not many posts.
  • 2009: Like the previous year. A small side step about game consoles.
  • 2010: More dev stuff, first non-tech post. At this point the posts start to get more thought put into them.
  • 2011: Conscription makes me ponder my life's choices. And perhaps ending it. A rather special year, with most posts about non-tech stuff.
  • 2012: A rather busy year; the level of thought reaching a "steady-state" :d Guild Wars 2 is released.
  • 2013: USG, refreshed.
  • 2014: Value.
  • 2015: A lot more value. Life is Strange happens.
  • 2016: The special interest of web development returns,
  • 2017: A rather busy year again, it seems; focus split to the first season of the vlog. Only a single post, but summing up the whole year.
  • 2018: A rather busy year, once again. Again a single almost panicked post before the year is over.
  • 2019: Hey look, we're back to producing value! With an asterisk. The new normal. Also, I finally graduated.
  • 2020: The new normal continues.
  • 2021: And continues; focus is split to vlog's second season. Return to gamadev.
  • 2022: The year some scary life-changing stuff is likely to start happening. There's a good chance I'll blog about it, you know.

Talk about value! There's surpsisingly lot of it. And lots of other stuff too, indeed. See you again in 10 years I guess, for the 25th aniversary. A time that seem more distant than ever before.


VLOG season 2

OMG. I did it! …again?

I’m not sure if I’ve mentioned it here before, but I have a VLOG in finnish. A few years ago, I shot and edited eight episodes of me talking about what I’ve been doing, or what I’ve been cooking. I also made one special episode about some low-level serverless technology alternatives with C# and dynamic code compilation and execution, including syntax tree editing. I didn’t dare to publish any of these, but they exist.

Now I’ve began the second season, with more focus on technology. Perhaps gamedev. And this time it might just be good enough for public release! The format itself is still subject to evolution, but the two episodes I’ve so far completed serve as an introduction to the series and the reasons behind its existence.

Though, truth be told the first episode isn’t that good, and made me hesitate on the whole thing. Ultimately, I decided that I’d shoot an episode or two more, and if they are good enough, they could perhaps redeem the farce that is the first episode. I think it would be quite bad if the only episode available was the first one, and it was unbearable to watch. But if there’d also be some better episodes immediately available, the viewer could perhaps skip the first one and, and decide to like the series based on those later episodes :3

I’m now at the point where I have one better episode ready. Although even that starts a bit weary. But it gets better! Content-wise I’m still debating. So far, the series has been only about me, and isn’t really useful for anyone ­– unless they just want to get to know me better. That would be perfectly fine if I had a fanbase, but the case is completely the opposite, so I’m not sure why I’m bothering with this. But, as said, at least the episodes still have the purpose of laying the foundations for the episodes to follow, should someone want to invest (more of) their time in all this right now, or at a later date.

I’m also still not sure of the best way to present the auxiliary information about each episode. Not that anyone would really care. First of all, I have a short description of each video in YouTube’s video description field. That is fine. But I also have some ‘technical’ notes about the video there just in case; perhaps to deter some obvious commenters. Much of these notes are also duplicated on my own website, but not all. And vice-versa the site contains some notes not on the video description. I’d like to unify these somehow. I’d like to have as much information on my own site as possible, yet I feel like there should also be some on the video description for those obvious cases. But maintaining these two in sync is a pain, and they have each have their own purposes :( So what do?

But, anyway. Here’s the page for the new season. It goes a bit more in depth into the production of individual episodes. There's also the near-complete script available for each video if you just want a quick overview of the stuff. Then there's also those video links. Videos themselves are still unlisted, but the links are there D: